How to create a Next.js markdown blog with syntax highlightingLearn how to put together a basic blog using Next.js, markdown, highlight.js, rehype and gray-matter.

This blog will take you through the steps of creating a basic blog using Next.js and Tailwind CSS that loads its content from MDX (extended markdown) files. It also shows how syntax highlighting for code blocks in the blog posts can be added using highlightjs and rehype. The code for this tutorial can be found in this GitHub repo.
Step 1: create a basic Next.js project
Create your project — answer yes to all the prompts:
npx create-next-app@latest markdown-blog
Install these libraries to help with loading in and parsing mdx files, as well as adding syntax highlighting:
npm i gray-matter next-mdx-remote @next/mdx @mdx-js/loader @mdx-js/react @types/mdx rehype-highlight tailwind-highlightjs highlight.js
Step 2: add in some blog content
Create a top level directory for the blog posts, I called mine blog-posts
Add a couple of mdx files — use the ones from my repo if you want. They have a section at the top containing metadata about the blog which we can parse using gray-matter. This metadata could be expanded, e.g. you could add a image property that stores the path to an image to be shown at the top of the blog post.
/blog-posts/about-me.mdx
---
title: "About me"
description: "Hi there!"
date: "August 31st, 2024"
tags:
  - title: Me
  - title: Myself
  - title: And I
---

## Hi I'm Bob

I do software development

_my fave bit of code is this:_

```JavaScript
function sayHello() {
  console.log('Hello world');
}
```
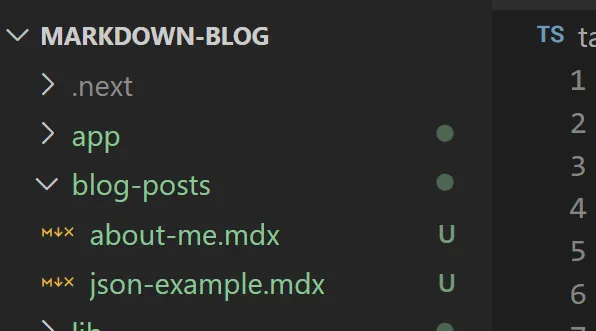
Here’s what my project looked like after adding the directory for blog posts and adding a couple mdx files into this directory:

Step 3: load the blog posts and show them on the home page
Create a lib directory and a file called blog-posts.ts and put this code in it. It loads all the mdx files in the blog-posts directory, parses the slug (or id) for each post from the file name, and also parses the metadata and blog content from each file using gray-matter.
lib/blog-posts.ts
import fs from "fs";
import path from "path";
import matter from "gray-matter";

const postsDirectory = path.join(process.cwd(), "blog-posts");

export function getAllPostsData(): {
  slug: string;
  metadata: any;
  content: string;
}[] {
  const fileNames = fs.readdirSync(postsDirectory);

  const allPostsData: any[] = fileNames.map((fileName) => {
    const slug = fileName.replace(/\.mdx$/, "");
    const fullPath = path.join(postsDirectory, fileName);
    const fileContents = fs.readFileSync(fullPath, "utf8");
    const { data: metadata, content } = matter(fileContents);

    return {
      slug,
      metadata,
      content,
    };
  });

  return allPostsData;
}
Now on the home page we can use the getAllPostsData function to load all the blog posts and iterate over each to show a list item for each post containing the title and description that is also hyperlinked to the blog post page using the blog’s slug.
app/page.tsx
import { getAllPostsData } from "@/lib/blog-posts";
import Link from "next/link";

export default async function Home() {
  const allPostsData = await getAllPostsData();

  return (
    <main>
      <header>
        <h1>My Blog posts</h1>
      </header>
      <section>
        <ul>
          {allPostsData.map(({ slug, metadata }) => (
            <li key={slug}>
              <Link href={"./blog/" + slug}>
                <h2>{metadata.title}</h2>
                <p>{metadata.description}</p>
              </Link>
            </li>
          ))}
        </ul>
      </section>
    </main>
  );
}
If you start the dev server (run npm run dev in the terminal) and open localhost:3000, you should be taken to the home page where each blog post is listed out. It looks terrible with no styling, but it’s a good start. If you click on the top post it should try to open a page with the URL http://localhost:3000/blog/json-example, which wont work…yet. That’s the next step.
Step 4: create a page for displaying individual blog posts
Create a directory inside the app directory called blog, then another directory inside that called [slug], and then create a page.tsx file in there.
To show basic blog content put this code in page.tsx:
app/blog/[slug]/page.tsx
import { getAllPostsData } from "@/lib/blog-posts";
import { MDXRemote } from "next-mdx-remote/rsc";
import React from "react";

const allPostsData = getAllPostsData();

export const generateStaticParams = async () => {
  return allPostsData.map(({ slug }) => ({ slug }));
};

function BlogPost({ params: { slug } }: any) {
  const { content, metadata } = allPostsData.find(
    (post) => post.slug === slug
  )!;
  return (
    <main>
      <header>
        <h1>{metadata.title}</h1>
        <em>{metadata.description}</em>
      </header>
      <article>
        <MDXRemote source={content} />
      </article>
    </main>
  );
}

export default BlogPost;
The use of generateStaticParams allows Next.js to iterate over all the blog posts at build time and create static pages for each one using the slug passed to the BlogPost component. The blog content is passed to the MDXRemote component in order for it to be displayed.
If you click on one of the posts on the home page, you should now be able to view the parsed content of the mdx file — but with no syntax highlighting yet.
Step 5: add syntax highlighting
In the blog page component, add this import:
app/blog/[slug]/page.tsx
import rehypeHighlight from "rehype-highlight";
And pass in an options prop to the MDXRemote component like this:
app/blog/[slug]/page.tsx
<MDXRemote
  source={content}
  options={{
    mdxOptions: { rehypePlugins: [rehypeHighlight] },
  }}
/>
If you save these changes, reload one of the blog posts and inspect the elements on the page, you should be able to see that hljs (highlightjs) classes have been added to the code content — but that syntax highlighting is still not working:

This is because we need to modify the tailwind.config.ts file in the top level of the project directory. First, add hljs to the theme:
tailwaing.config.ts
hljs: {
  theme: "github-dark",
},
Then add tailwind-highlightjs to the plugins array:
tailwaing.config.ts
plugins: [require("tailwind-highlightjs")],
…and add a safelist to allow hljs classes:
tailwaing.config.ts
safelist: [
  {
    pattern: /hljs+/,
  },
],
For reference, my entire tailwind config file looked like this:
tailwaing.config.ts
import type { Config } from "tailwindcss";

const config: Config = {
  content: [
    "./pages/**/*.{js,ts,jsx,tsx,mdx}",
    "./components/**/*.{js,ts,jsx,tsx,mdx}",
    "./app/**/*.{js,ts,jsx,tsx,mdx}",
  ],
  theme: {
    extend: {
      colors: {
        background: "var(--background)",
        foreground: "var(--foreground)",
      },
    },
    hljs: {
      theme: "github-dark",
    },
  },
  plugins: [require("tailwind-highlightjs")],
  safelist: [
    {
      pattern: /hljs+/,
    },
  ],
};
export default config;
If you save these changes and view either blog page you should be able to see the syntax highlighting at work — job done!:

Bonus step: customize the components used inside MDXRemote
To make things look a bit better its possible to override styling and use custom React components inside the mdx files.
This example shows how to create a component for encapsulating the code blocks used inside the blog posts — so firstly let’s create a components directory at the top level of the project. Then inside that create a code-block.tsx component:
comppontnes/code-block.tsx
import React from "react";

function CodeBlock({ name, children }: any) {
  return (
    <div className="border">
      <h3 className="border-b p-3 font-mono">{name}</h3>
      <div className="p-3">{children}</div>
    </div>
  );
}

export default CodeBlock;
Then, also at the top level create an mdx-components file with this code inside it:
mdx-components.tsx
import type { MDXComponents } from "mdx/types";
import CodeBlock from "./components/code-block";

export function useMDXComponents(components: MDXComponents): MDXComponents {
  return {
    h1: (props) => <h1 {...props} className="mb-4 text-4xl font-bold" />,
    p: (props) => <p {...props} className="mb-4" />,
    pre: (props) => <pre {...props} />,
    ul: (props) => <ul {...props} className="list-disc ps-8 mb-4" />,
    a: (props) => <a {...props} className="underline" />,
    code: (props) => <code {...props} className="rounded-0" />,
    CodeBlock: (props) => <CodeBlock {...props} />,
    ...components,
  };
}
Further custom components and style modifications can easily be added into this file.
To stop tailwind from purging its classes from the mdx-components file add “./mdx-components.tsx”, to the content array in tailwind.config.js.
tailwaing.config.ts
...

const config: Config = {
  content: [
    "./pages/**/*.{js,ts,jsx,tsx,mdx}",
    "./components/**/*.{js,ts,jsx,tsx,mdx}",
    "./app/**/*.{js,ts,jsx,tsx,mdx}",
    "./mdx-components.tsx",
  ],

...
The final step before these components can be used is to pass in mdx-components to the MDXRemote component as a prop.
app/blog/[slug]/page.tsx
import { useMDXComponents } from "@/mdx-components";

...

function BlogPost({ params: { slug } }: any) {
  const mdxComponents = useMDXComponents({});

...

<MDXRemote
  source={content}
  options={{
    mdxOptions: { rehypePlugins: [rehypeHighlight] },
  }}
  components={mdxComponents}
/>

...
You can now use the CodeBlock component inside an mdx file — below is an example of how it could be used in the about-me blog file:
blog-posts/about-me.mdx
_my fave bit of code is this:_

<CodeBlock name="helloworld.js">
```JavaScript
function sayHello() {
  console.log('Hello world');
}
```
</CodeBlock>
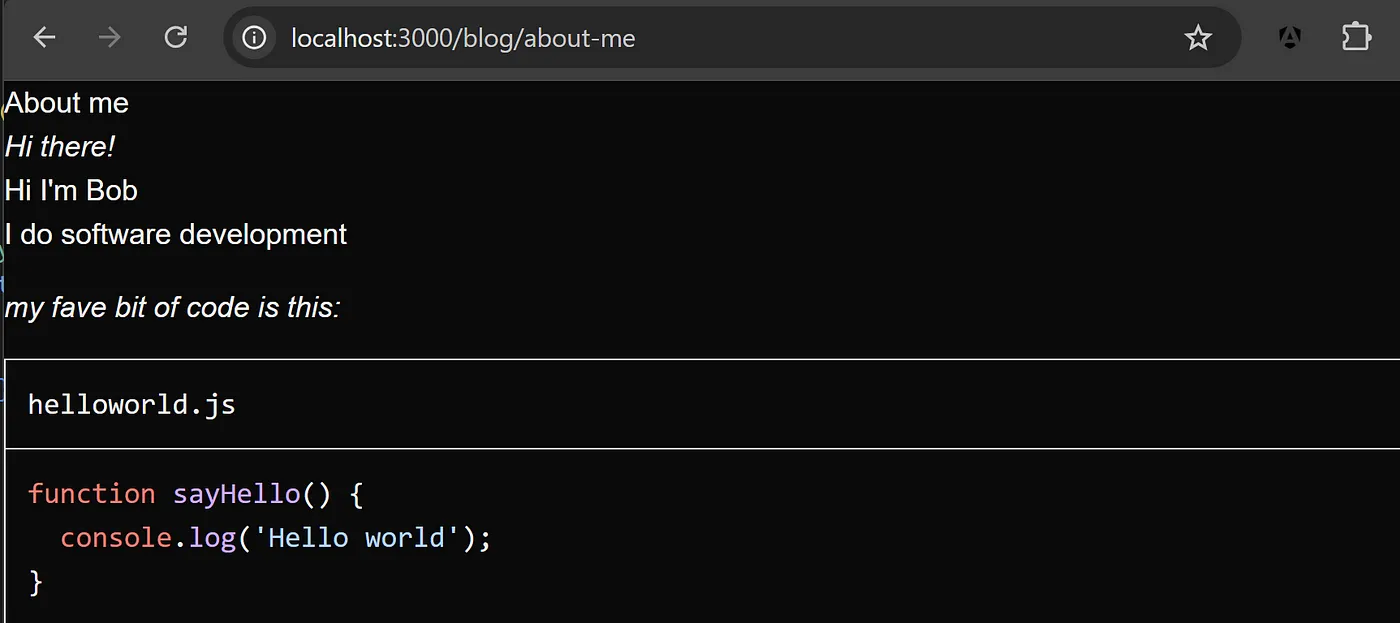
Once all those changes are saved and reloaded the ‘About me’ post should look something like this:

There’s loads of ways this could be improved — additional components, better styles, a ‘copy code’ button on the CodeBlock component etc. But this is a good foundation for building an extensible and well styled blog that also makes use of Next.js’s Static Site Generation functionality to increase performance and improve the end user experience.
Thanks for reading, I hope it’s been helpful! As a reminder, all views I express here are my own and do not necessarily reflect those of my employer (or anyone else for that matter).